Tax season feels stressful when every document lives in a different place.
One form is in email. One is in the mailbox. A charity receipt is in a drawer. A bank form is inside an app. A 1099 arrives late. A school or childcare receipt is missing. Someone asks for last year’s return, and nobody remembers where it was saved.
The work becomes harder than it needs to be.
A basic tax document folder does not prepare your return for you. It simply keeps the important pieces from scattering before January.
The goal is simple:
When tax forms start arriving, they should have one safe place to go.
Build the folder before the forms arrive
Do not wait until January.
Create the folder in September, October, November, or December, while you are calm.
You need two versions:
A physical folder for paper mail and receipts
A digital folder for downloads, emails, and screenshots
The physical folder can be:
A file box
A large envelope
A binder
A drawer folder
A labeled document pouch
The digital folder can be:
A secure computer folder
Encrypted cloud storage
A tax folder inside your password-protected storage system
A folder shared only with your spouse or tax preparer, if needed
Do not use random screenshots across your phone gallery as your tax system.
Create one place before the tax documents arrive.
Name it clearly
Use a simple name.
Examples:
Tax Documents 2025
Tax Folder 2025
2025 Tax Records
Documents for 2026 Filing
The year can be confusing because you usually file in the next calendar year for the previous tax year.
For clarity, use the tax year.
Example:
If the documents are for income earned in 2025, name the folder:
2025 Tax Documents
Even if you file in 2026.
This avoids mixing years.
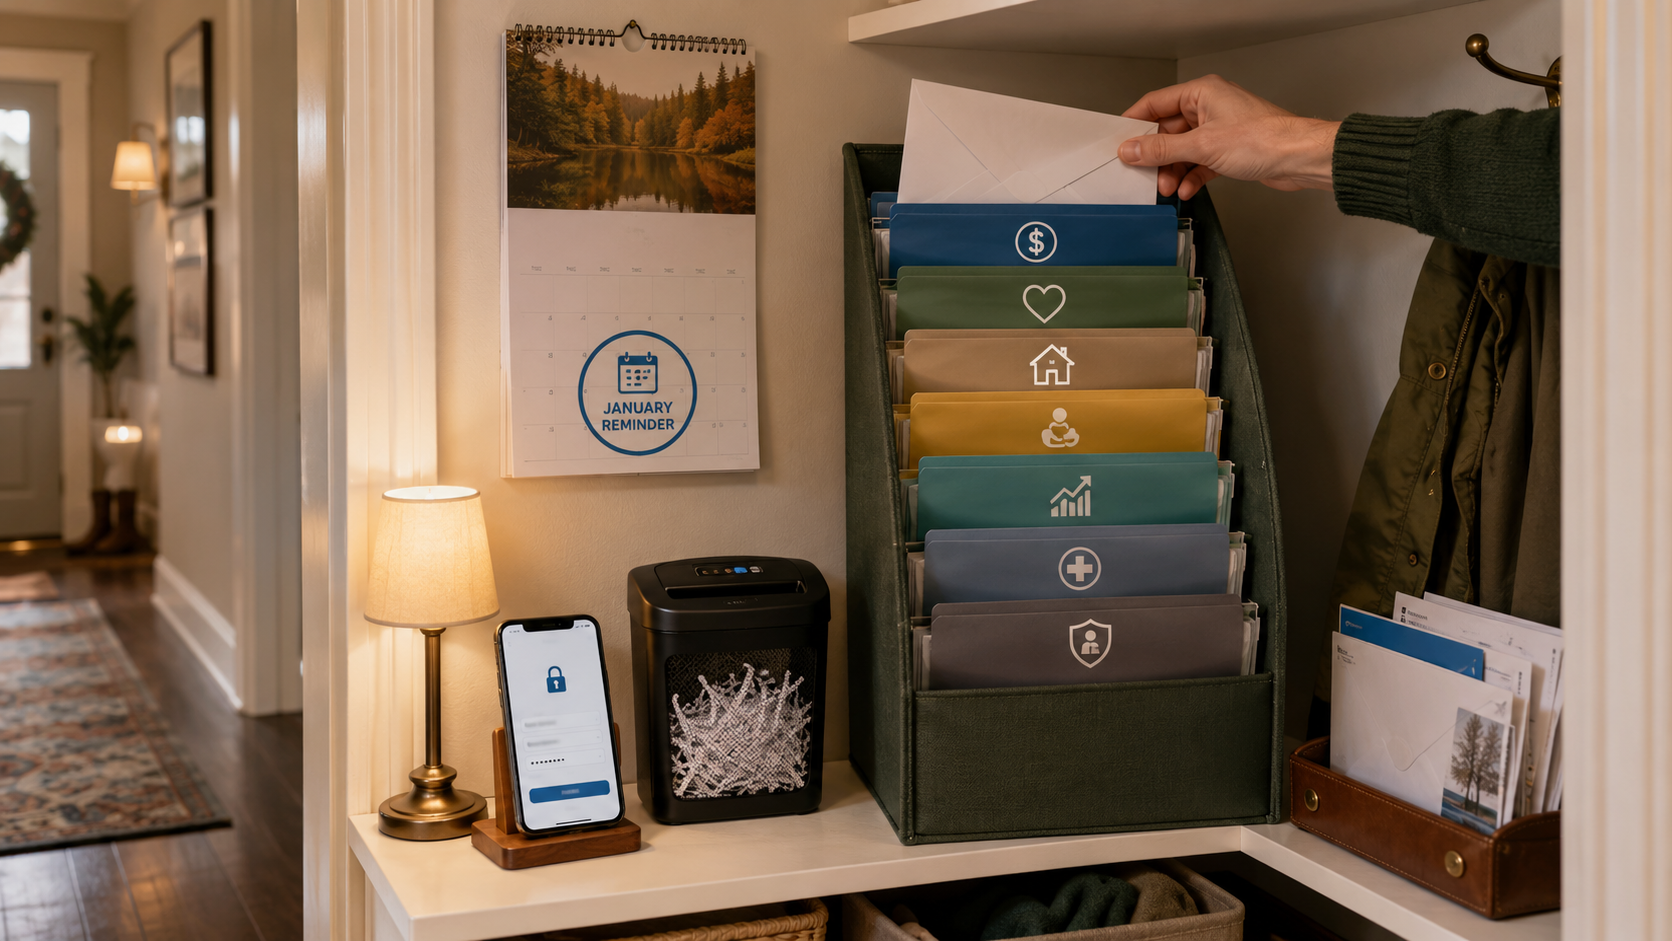
Make seven sections
A basic tax folder does not need 40 categories.
Start with seven.
1. Identity and family details
This is not for leaving sensitive documents lying around. It is for knowing what information you need.
Include or securely reference:
Full legal names
Social Security numbers or ITINs
Dates of birth
Current address
Prior-year address, if changed
Dependents’ details
Bank routing and account number for refund or payment
Last year’s tax return
IRS Identity Protection PIN, if issued
Be careful with this section. It contains sensitive information.
If you keep it digitally, protect it. If you keep it physically, store it somewhere locked or private.
2. Income forms
This is where most people start scrambling.
Collect:
W-2 forms
1099-NEC
1099-MISC
1099-K
1099-INT
1099-DIV
1099-B
1099-R
SSA-1099
Unemployment forms
Pension or retirement forms
Side-income records
Business or freelance income summaries
Rental income records, if relevant
Many forms arrive in January or February, either by mail or electronically.
Make a checklist of expected forms before they arrive.
Example:
Expected income forms:
Employer W-2
Bank interest 1099
Brokerage 1099
Freelance platform 1099
Savings account interest form
When each one arrives, check it off.
This prevents filing too early and forgetting a late form.
3. Deduction and credit documents
This section depends on your life.
Possible documents include:
Mortgage interest statement
Property tax records
Student loan interest statement
Tuition form
Childcare payment records
Dependent care provider details
Adoption-related records, if relevant
Energy credit documents, if relevant
Retirement contribution records
Health Savings Account forms
Medical expense records, if relevant
Educator expense records, if relevant
State or local tax documents
Not every household needs every item.
Do not collect random documents just because they sound tax-related. Collect what may apply to your return.
If unsure, place it in a “review” section rather than throwing it away.
4. Charity receipts
Charity records are often scattered.
Create one charity section.
Include:
Donation receipts
Year-end charity summaries
Email confirmations
Bank or card records for donations
Receipts for donated goods
Written acknowledgments for larger donations
Mileage or volunteer expense records, if applicable
Name of organization
Date of gift
Amount or description
Do not assume every donation is deductible. Rules apply, and deductions depend on your tax situation.
But if you plan to claim charitable contributions, you need records.
A good habit:
Every time you donate, save the receipt immediately into the tax folder.
Do not leave it in email only.
5. Account forms
Banks, investment firms, retirement accounts, payment apps, lenders, and marketplaces may issue forms or year-end statements.
Create a section for account-related tax documents.
Look for:
Bank interest forms
Brokerage statements
Stock sale forms
Retirement distribution forms
IRA contribution records
HSA forms
Mortgage statements
Student loan interest forms
Payment platform forms
Marketplace income forms
Crypto exchange tax reports, if relevant
Year-end account summaries
If an account may generate a tax form, write it on the expected list.
Many forms are not mailed anymore. You may need to download them from the account portal.
6. Business, side work, or self-employment records
If anyone in the household earns side income, do not wait for a 1099.
You may have income even if no form arrives.
Keep:
Invoices
Payment records
Platform statements
Bank deposits
Mileage records
Supply receipts
Home office notes, if relevant
Software subscriptions
Equipment receipts
Contractor payments
Business insurance
Phone or internet records, if relevant
Tax payments made during the year
Do not mix personal spending and business records if you can avoid it.
Even a simple side gig needs better records than memory.
7. Questions and missing items
This is the most useful section.
Make a “Questions” page.
Write things like:
Did we receive the second W-2?
Need childcare tax ID?
Did the charity send receipt?
Need 1099 from platform?
Did we sell stock?
Did we change address?
Did we receive unemployment?
Did we contribute to IRA?
Did we get an IRS notice?
Did we make estimated tax payments?
This page prevents mental clutter.
Instead of trying to remember everything, you park the question in the folder.
Create an expected-document checklist
Before January, write down every form you expect.
Use last year’s return as a guide.
Look at last year and ask:
Who sent us a W-2?
Which banks sent forms?
Which investment accounts sent forms?
Did we have mortgage interest?
Did we have student loan interest?
Did we claim childcare?
Did we donate to charities?
Did we have side income?
Did we receive unemployment?
Did we sell investments?
Did we receive retirement income?
Did we have marketplace or payment app income?
Then add new life changes from this year.
Examples:
New job
Second job
Freelance income
New baby
Childcare started
Moved states
Bought a home
Sold investments
Opened brokerage account
Started side business
Paid tuition
Made charity donations
Got health insurance through marketplace
Received unemployment
Retired
Changed bank accounts
Your checklist tells you when the folder is complete enough to prepare the return.
Do not file before key forms arrive
Filing early can be good, especially for reducing identity-theft risk and getting refunds sooner.
But filing too early can cause mistakes if important forms are missing.
Wait until expected income forms and key account forms arrive.
If you file and later receive a missing W-2 or 1099, you may need to amend or correct the return.
Use the expected-document checklist.
If a form is missing by the usual arrival period, contact the employer, bank, platform, or issuer.
Do not guess numbers if an official form is expected.
Save last year’s return in the folder
Your prior-year tax return helps with:
Comparing income
Checking missing forms
Confirming dependent details
Preparing current-year return
Answering tax software questions
Giving records to a preparer
Tracking carryovers, if any
Finding adjusted gross income when needed
Save:
Full federal return
State return
W-2s and 1099s used
Payment confirmation
Refund confirmation
Tax preparer invoice, if any
Extension confirmation, if any
If you used tax software, download the PDF and store it safely.
Do not assume the software account will always be easy to access.
Use a secure digital habit
Tax documents contain sensitive information.
Do not store them casually.
Avoid:
Unprotected phone photos
Shared family devices without passwords
Emailing full Social Security numbers
Uploading to random links
Saving documents to public folders
Sending tax documents through social media messages
Leaving printed forms in a car
Throwing old forms into trash without shredding
Using weak passwords for tax accounts
Better habits:
Use strong passwords
Turn on multi-factor authentication where available
Use secure portals when working with a tax preparer
Store documents in a protected folder
Shred old documents you no longer need
Keep paper forms in a private place
Limit who can access the folder
A tax folder should be organized and protected.
Watch for tax-season scams
A tax document folder should also help you avoid scams.
Be careful with messages that:
Claim your refund is waiting
Threaten arrest or legal action
Ask you to click a link to “verify” tax information
Ask for bank details by email or text
Demand payment by gift card, crypto, wire, or payment app
Pretend to be the IRS or a tax software company
Send unexpected attachments
Ask for your W-2 or payroll login
Claim you must act immediately
Do not click unexpected tax links.
Go directly to the official website or your known account login.
If you receive a suspicious IRS-related email or message, follow IRS reporting guidance rather than replying.
Keep a mail tray for tax forms
Many tax forms still arrive by mail.
Create a simple rule:
Tax-looking mail goes into the folder the same day.
Not on the counter. Not in the car. Not in a random drawer.
Use a mail tray or envelope labeled:
Tax Mail, Do Not Throw Away
Put it near where you sort mail.
This matters because W-2s, 1099s, mortgage forms, and charity summaries can look like ordinary mail.
A small tray prevents accidental tossing.
Create an email search routine
Many tax documents arrive electronically.
In December or early January, create email search terms:
W-2
1099
tax document
tax form
year-end
contribution
donation receipt
mortgage interest
student loan interest
HSA
IRA
brokerage tax
charitable receipt
tuition
childcare
statement available
When you find a tax email, download the PDF from the official account portal when possible.
Do not click links in suspicious emails.
If unsure, open a browser and type the official site address yourself or use a trusted bookmark.
Photograph receipts carefully
For paper receipts that fade or are easy to lose, scan or photograph them.
Good receipt photo habits:
Use a flat surface
Capture the full receipt
Make sure date, amount, and organization are visible
Rename the file clearly
Save it in the right folder
Keep the paper copy if needed
Avoid storing only in a messaging app
File name examples:
2025-03-14-charity-donation
2025-childcare-payment-summary
2025-medical-receipts-review
2025-business-supplies-receipt
Do not include full Social Security numbers or sensitive account numbers in file names.
Add a “not sure” envelope
Some documents may be confusing.
Do not throw them away.
Put them in a “not sure” envelope or digital subfolder.
Examples:
IRS notice
State tax letter
Health insurance form
Marketplace form
Brokerage notice
Charity acknowledgment
Settlement notice
Tuition statement
Legal settlement document
Unusual account statement
Crypto tax report
Side-income summary
Later, ask a qualified tax professional or use official guidance.
The “not sure” envelope is better than a junk drawer.
Share safely with a tax preparer
If someone prepares your taxes, ask how they want documents delivered.
Use:
Secure client portal
Encrypted upload link
In-person delivery
Secure mail, if needed
Password-protected files, where appropriate
Avoid:
Sending everything by plain email without checking
Texting photos of Social Security cards
Uploading to unknown links
Giving documents to someone without verifying them
Using a preparer who will not sign the return
Letting someone file without reviewing the return
Before working with a preparer, confirm they have a valid preparer tax identification number if they are paid to prepare federal returns.
Do not hand sensitive documents to someone just because they promise a bigger refund.
Review the folder in December
Do a 20-minute December review.
Ask:
Is the folder created?
Is last year’s return saved?
Is the expected-document checklist ready?
Are charity receipts saved?
Are side-income records updated?
Are childcare or school records collected?
Are account logins working?
Are passwords safe?
Are tax-related emails saved?
Are paper documents in one place?
Are scam warnings clear to everyone in the household?
This review makes January easier.
The best time to build the folder is before forms start arriving.
A realistic example
A family usually starts taxes in February and gets stuck.
They cannot find one W-2. The childcare provider’s tax ID is missing. Donation receipts are spread across email. A bank 1099 is inside a portal nobody has logged into for months.
This year, they create the folder in September.
They make seven sections: identity, income, deductions, charity, account forms, side work, and questions.
In December, they check last year’s return and write expected documents.
In January, each form goes straight into the folder.
By February, they still have to prepare the return, but they are not hunting through drawers, emails, and old mail.
That is the win.
The folder does not make taxes fun. It makes them less chaotic.
The basic tax folder checklist
Create these sections:
Identity and family details
Income forms
Deduction and credit documents
Charity receipts
Account forms
Side work or self-employment records
Questions and missing items
Then add:
Last year’s return
Expected-document checklist
Tax mail tray
Secure digital folder
Receipt photo system
Scam-safe sharing rule
If you do only this, tax season becomes easier before it even starts.
Final thought
Tax stress often comes from missing documents, not hard math.
A basic tax document folder gives every form a place to land.
Before January, create the folder, list expected forms, save last year’s return, organize charity receipts, prepare for W-2s and 1099s, protect sensitive information, and avoid suspicious tax links.
You do not need a perfect filing system.
You need one safe place where tax documents stop disappearing.
Reader Discussion
Comments
Comments are reviewed before appearing publicly.Reader comments